Update: If you want to know more about what machinery I used see:
https://a-zproj.blogspot.com/2020/08/so-you-have-rotten-window-mullioned-to.html
This blogpost is mostly my note so I don’t forget how to do what’s described below. I’ve adapted is slightly to outside viewers. I’m an autodidact so I may give you misleading advice, it’s up to the viewer/reader to determine if this is fake news. I take no responsibility for my bad communication skills.
The procedure below may seem cumbersome and it is. This, however, is the price you pay when buying a table saw for $1000, weight about 30 kg instead of buying a saw for $4000, weight 300kg (which is the one you’d really would like to have). It’s also a question of movability, the cheaper one fits in my car's luggage compartment. The number of available square meters in you shop is another deciding factor. Something that speaks for owning a table saw at all, are the many odd jobs you can do in five minutes with perfectly usable precision, like a 2m wooden strip or a 80 cm long shelf etc. where using a universal handsaw sucks royally. As usual, reality corners you.
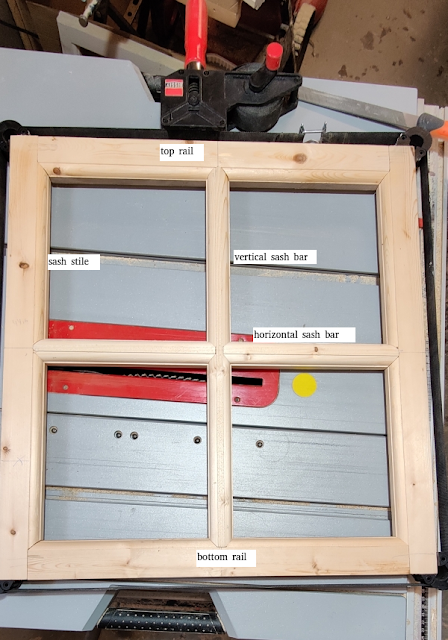
Better start with some nomenclature. Stolen from ” https://www.thespruce.com/window-muntins-and-mullions-1822920 ” is this piece of information. Just for the fun of it I’ve decided that my windows consist of top and bottom rails, sash stiles and sash bars, both vertical and horizontal.
When i speak of "windows", it’s only the part carrying the glass that matters (to me), the part of a window fixed to the wall (the window frame) is not a part of my project. Yet.
The image below is stolen from https://www.salisburyjoinery.com/hs-fs/hubfs/Blog%20images/sj-diagram-sash-window-terminology.png?width=744&height=595&name=sj-diagram-sash-window-terminology.png where you possibly can learn more about modern windows
And for my example this would mean:
I start with sawing the rails and stiles to the correct measures, 32.2X45.0mm, cross
sectional and 548.0mm, 515.0mm in length for stiles and rails, respectively. I try to
be as exact as physically possible, using my table saw, which means I try to get
the dimensions as close to 1/10 of a mm as possible. This will *not *be possible
in real life, but always striving for it will limit errors adding up when assembling the
different parts in the end. Please use calipers when measuring! :0)
I end up with this:
Admittedly, not very exciting, but (relatively) exact.
Then it’s time to make the grooves carrying the glass (outside) and the decoration
(on the inside). The choice of decoration is guided (an approximation) by what's
already is used in the house where the finished window will be installed.
I use a Makita router, fixed to a table to make these. For the decoration I use a
router bit from Cobolt, 217-095, R=9,5 mm
(see table in picture). It looks like this (not the roller bearing in the small end):
For the square groove i use a straight bit that leaves a square groove.
In my case this groove is 10x10mm and experience shows, this is too much to route
in a single action so I made an insert (clamped to the vertical support) that limits
the depth of the first cut to 5mm. After removing it, I make a second cut to get the final
10mm depth.
The first thing I made after buying the router was a router table. It looks like
this in my application:
Changing the router bit to the Cobolt one, the depth of the lower groove (image below)
is going to be sideways constrained by the width of the roller bearing (at the small end
of the router bit). Adjusting the height of the bit from the table I have to match the other
groove to it so they will look equal.
This is not possible to discern in the image though.
The windows I will replace had a problem. Water, when raining, was collected under the lower rail, sucked into the wood and rotting started. These windows was made
with a sort of forking joint (the one to the left):
I use the simpler joint to the right.
[Comment: I want to move the joint sucking water nearer the inside of the window and
I want to make the joint in one single point, avoiding the outer, the one
more exposed to moisture. This will lessen the strength of the joint but may
delay critical sucking up water.
Let’s say it still does rot and I would like try to forestall the total disintegration of the
window, then I could use a wooden plug from the inside but not extending to the
outside. If glued, this could prohibit the collapse when my joints become totally rotten,
near end of life.
Just a thought. We’ll see after some years of use if this is going
to be necessary. I use polyurethane glue which is very water resistant so
that ought to work out.
As long as the window doesn’t scrape the sill when opening it, there will be
very little stress on these joints. The stability of a finished window is more
dependent on the glass and putty than on the corner joints.]
To make the A cuts I use a home made contraption to assure the cut is 90°. The cuts
are the like the A cut but not quite as deep. Fine adjustments are made later.
Then I do final adjustments until the two peaces fit exactly together. This
takes some time. I try the fit, adjust some and retry until they fit exactly.
I mark the ends with a number so I know which rail end fits perfectly to which
stile end. Since everything is handmade it’s necessary (at least when I’m
doing it:). There *will* be differences between cuts, unfortunately.
[Comment: As you can see, the rail in the groove that holds the contraption to
the saw table is made of wood. The precision of the saw is good enough to
produce these, I made several to other tools and a sled. In the right picture,
some wooden blocks in a pile sawed to ”exact” number of mm differing in 1 mm
steps, used to make a coarse setting of the width of the cut. They make setting
up the saw a bit quicker, fine adjustments and some testing on scrap bits to
check the exact result have still to be done.
Since measuring and setting is time consuming, making all parts with the
same dimensions in a row saves a *lot* of time.]
Then I make a new cut B, perpendicular to the one shown. Doing this, I also fine
adjust the A cut’s length. I also remove most of the part of the decoration.
See the image above.
The "decoration" side of rails and stiles is is on the window's inside and to join them
I have to make a 45° cut in all of them. They must end at the exact point where the
distance A ends, not one mm or part of a mm more, otherwise the joint would look
outright awful from the inside. Below is the picture of the finished ends of rails and
stiles:
[Comment: As you can see the rails have the material removed from the side facing inwards, the stiles from the side facing outwards.Do not repeat my mistake removing material from the same sides, oblivious
of my error due to lack of concentration on the subject at hand. I do this a lot,
probably some mental deficiency. If you do, you will have to remake these parts.]
The next step is the making of the horizontal and vertical sash bars fit when mounted.
This is means cutting ends to 45° at the ends of both rails and stiles.
This a purely try, fit, and try again moment.
The picture above shows the ends of the stiles and rails when the 45° cut is made.
Anyone can see there are discrepancies from the one tenth of a mm rule. The cuts
shown after lots of iterations making the ends fit nearly seamlessly. Reality is what
it is.
Coming this far you have a nice framework (the window parts on top of it, is a
"don't care". The term is coming from the IT-market and means you should disregard it.):
Note: the very useful band clamp. A must have when making windows!
The next step is to make the crossed sash bars. In my world these are 32.0mm
high, and the witdh is 30.0 mm. That means they have a top and a bottom side. The
bottom side is defined by routing a grove on each side, 10mm by 10mm and the
top is defined by routing decorations on each side. Then you get:
Note: the 45 ° cut must end by the red line in the image above. There is no room
for error, sawing too much.
If you do, you will have to throw the piece on the scrap heap.
Next, the sawing of the cross of sash bars. Exciting times, if I miss I'll have to
make new ones. Not a very attractive alternative at this point, I assure you. I've
been there. But before doing that, I have to check that they are exactly of the
correct lengths. For that I need the band clamp shown in the image at the top,
showing a completed widow. When applied, I can lay the finished sash bars in
their correct positions, checking that they end exactly at the groove (indicated
by the little red circle in the image) at both ends. If not, go back and remake
the sash bar.
When that's OK, I now saw the 45° cut on all the four ends of the bars. Next I
have to find where the middle of the bar is and mark it. For the marking to be
possible to see when sawing I use a slip of paper, the kind I use for printing
things from my computer. I cut a strip some 20mm wide and use as a ruler.
Like this:
I use the straight side, not the one resulting from my scissor paperwork, tightening it hard checking the "ruler" side is aligned at the free end and draw a thin line after the
papers edge.Time to saw. I iterate with the blade until I reach a point where it touches
the line marking the middle, then turn the sash bar 180 degrees and do it again.
It sounds straight forward but since after the turn I have no line left I will have to go
by the already made cut. This is best done after some training cuts. The result is like:
As you can see, I missed the mark slightly, that is not a problem, i can then saw to the left or right until the checking against the end of the other sash bar fits exactly, thus
moving the V-shape compared to the mark (until the V becomes too wide! :). I can also miss and then the sash bar
becomes fire wood.
When done, they will look like this:
Now there's only one thing left. To make them possible in a cross mount I will have to
saw a little extra groove, leaving them looking like this:
So, now I test that they work. It should be a really tight fit, i may have to fiddle
with them for a while pressing them together, and dismounting them several times
before they finally give in and fit. Perfectly.
Having a cross, I check it's square 90° (otherwise each pane has to be tailored to it's
place, which would be ridiculous). Then I test it in the frame and check that it fits
squarely in it. 90° degrees everywhere, you know the drill. Then I mark the exact
midpoints of the bars endings on the frame. That's where the next sawing will take
place. They will look like this when finished:
You're done! Mount the window and tighten the band clamp you already have bought
and the result is like what is shown in the beginning of this HOWTO-rant.
Disclaimer: I don't recommend making windows my way, I just make them. Find a better way if you can. I just want to show that with a table saw and a hand router,
you can make windows. I didn't even take a course to do it.